Linda Nelson

THRIFTY HANDMADE WATERPROOF GARLAND

How do you spend rainy day weekends?  I usually tend to some house cleaning and then I get crafty.  That’s what I did yesterday as the rain poured and the wind blew like mad.  But first, I made a quick trip to the thrift store to hunt for….. plastic placemats.  Yep, I wanted dollar store-type plastic placemats.  I’ve had the desire to make one of those pennant/banner garlands for quite some time; however, I wanted mine to be waterproof, weatherproof and durable.

I scored at the thrift store and found these two styles of placemats, which were not only waterproof, their colors complemented each other and they were only twenty-five cents each.  I grabbed my spool of floral wire and some jute garden twine, then created two triangle templates, one slightly larger than the other.  Then I got to work with cutting out and assembling my garland.

linda nelson at the createaerie

Isn’t it cute?  Peel-n-stick black vinyl lettering or a permanent marker could be used for adding a saying, but I’m going to leave mine as is for now.

Then I made a velvety pumpkin from a blazer-style blouse I purchased at the thrift store.  I’m giving that one to a friend; I’ll add the little pumpkin to my collection.

linda nelson at the createaerie
I also spent some time experimenting with a new felted mushroom design for future production.  I’m not exactly there yet, but the two that I made have given me a better insight into where I’m taking this.
linda nelson at the createaerie

linda nelson at the createaerie

Well, I hope you’ve been having a very nice (and crafty) weekend, too.

THRIFTY HANDMADE WATERPROOF GARLAND Read More »

NEIGHBORLY PLANTINGS AND A PEAK INTO MY LIVING ROOM

I was delighted when my neighbors asked me to revamp their front foundation shrub border last month.  They purchased this house several years ago, inheriting the contractor-esque plantings installed when it was built.

Here’s what the front border looked like for quite a few years.

linda nelson at the createaerie
This is what it looks like now!  It’s an easy care planting that will produce splashes of flowering color, perfect for these occupants’ getaway retreat from NYC’s hustle and bustle.
linda nelson at the createaerie
Yes, it looks a bit “fresh cut out of the barber shop”, but the newly planted material will relax, fill out and naturalize within a season or so.
Isn’t this Carex ‘everillo’ absolutely gorgeous?  It’s electric!
linda nelson at the createaerie
Okay, now let’s walk back over to my yard.
I snapped this photo of the walkway to my back yard last week.  I think that despite it being early autumn, things here still look fresh and tidy.
linda nelson at the createaerie
My home’s front entry doesn’t lend itself to creating that wow factor.  It can easily looked cluttered and out of balance if I’m not careful and selective; however, I do what I can to make it inviting.  I like to keep select summer annuals for as long as possible, as many reawaken and brilliantly bloom when the chilly evenings roll in.  I don’t exactly decorate for Halloween.  Instead, I slowly phase out the summery things and phase in a look that will carry me through late fall.
linda nelson at the createaerie
Okay, let’s take a quick peak inside.  I placed some “suggestive autumn-esque” things about.  Again, not Halloween, but subtle, yet playful seasonal accents.   I must apologize in advance with regard to the color quality and such.  The interior of my home is very difficult to photograph; it’s either too dark in the morning or too washed out from the sunlight in the afternoon.
This is my front door tussie-mussie.
linda nelson at the createaerie
Here’s my rope wreath…. chillin’ with St. Joseph.  
linda nelson at the createaerie
See…. the look is warm, friendly and transitional.  And a little kitschy 🙂
linda nelson at the createaerie

Don’t mind the withering floral bouquet.

linda nelson at the createaerie
Okay, so maybe this hand evokes a bit of Halloween creepiness.  Long ago I dated a gentleman that made creepy fired clay creations.  This is what’s left of him.
linda nelson at the createaerie
Here’s one of my old windows that I repurposed.
linda nelson at the createaerie
And here’s my cat, who will turn sixteen years old one month from now.  Isn’t he handsome?  I think so.
linda nelson at the createaerie
I hope you enjoyed hanging out in my neighbor’s front yard, in my living room……. and think my cat is handsome!

NEIGHBORLY PLANTINGS AND A PEAK INTO MY LIVING ROOM Read More »

GONE PUMPKIN PICKING!

I was hoping to go pumpkin picking in my own back yard this year, but between the squash borers and squirrels, I’ve had my share of competition.  However, they were were kind enough to leave my crop of butternut squash alone.

So, what have you been making lately?  While making my ropekin, I found that the paint stiffened the rope, and the look was to my liking.  I used the same “technique” to make this little autumn rope wreath.  I may end up making a big one; if I do, I will certainly share my creation with you!

linda nelson at the createaerie

Do you like my rustic little door?  I would love to have a front door that looks just like this one, but it wouldn’t work with the style of my home, and would require quite a bit of reconstructive surgery to make it work.  Anyway, I made this one from a deconstructed dresser drawer, and it will have to suffice as my dream door.

linda nelson at the createaerie

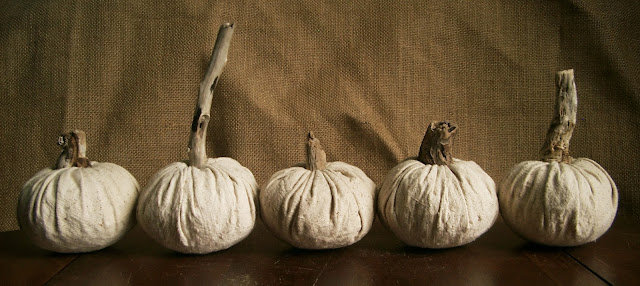
Five little pumpkins sitting in a row…….

linda nelson at the createaerie

These canvas and driftwood pumpkins are awaiting their debut at an upcoming fall fair I will be participating in.  I love their simplistic and raw look; I hope shoppers will too!

linda nelson at the createaerie

By the way, happy fall!  I hope your weather is just as gorgeous as my weather.

Now, go get creative.

GONE PUMPKIN PICKING! Read More »

MAKE A “ROPEKIN”

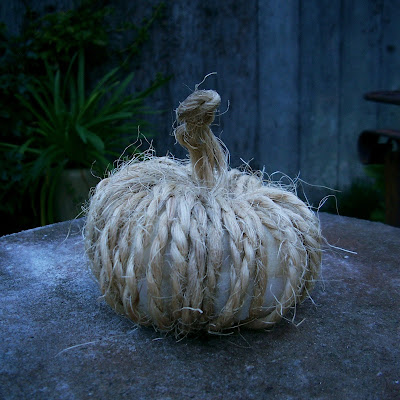
Thought I’d share this quick little crafty idea with you.  It’s a little rope pumpkin, or……… a ropekin!

linda nelson at the createaerie

I grabbed some scrap cushion foam and jute rope, then whipped up my little creation.  I stacked two pieces of foam together and trimmed them with scissors to get an overall rounded form, this one being roughly six inches in diameter and about four inches high.  The tomato mashing dibble was the perfect tool for creating a nice big hole in the center.

linda nelson at the createaerie

I wrapped one end of the rope (I used 36′ of rope for this project) with some duct tape, and fed it thru the “doughnut” hole all the way around.  When I reached the end of my rope (no pun), I simply made a little knot and tucked it up into the hole.

linda nelson at the createaerie

I then thought it would be neat to slap a coat of paint onto my little ropekin and add some embellishments; so that’s what I did.

linda nelson at the createaerie

Okay, now you make one!

MAKE A “ROPEKIN” Read More »

Scroll to Top